
A dental 3D printer is simply a machine that brings digital designs to life, turning them into physical objects such as splints, models, or surgical guides. 🦷 It is the definitive leap to leave plaster and manual methods behind, building pieces layer by layer with specialized resins to achieve a level of precision and speed that was previously unthinkable.
What is a dental 3D printer and how can it change your day-to-day
Imagine being able to go from an intraoral scan to a surgical guide ready to use in just a few hours. Not days. That is the reality that 3D printing brings to clinics and laboratories. This equipment is the heart of the digital workflow, the bridge that connects the design you see on your screen with the solution you deliver to the patient. 💻➡️🦷
In practice, it works like an ultra-high-precision builder. Starting from a CAD file (the 3D digital model), the printer deposits and solidifies liquid resin in extremely thin layers, often thinner than a human hair. This technique, known as additive manufacturing, makes it possible to create highly complex geometries with an accuracy that leaves behind the errors and imprecisions typical of artisanal processes using plaster and wax molds.
The digital workflow revolution
Incorporating a 3D printer is not a simple upgrade — it is an entirely new way of working. The change is felt at every stage of the process. It is a before and after.
- Agility and efficiency ⚡: Production times plummet. What previously took days of manual work, waiting, and shipping is now ready in a matter of hours. This allows you to see more patients and shorten treatment times.
- Micrometric precision 🎯: Digital consistency ensures that every piece is a perfect clone of the design. No more endless adjustments at the clinic. Crowns, splints, and guides fit right the first time, minimizing repetitions.
- Total customization 🧑⚕️: Manufacturing 100% tailored solutions for each anatomy no longer comes at an extra cost. With 3D printing, every piece fits like a glove to the specific needs of the patient.
- Lower costs and less waste 💰: Resin usage is optimized to the fullest, waste is reduced, and most importantly, dependence on external laboratories decreases, improving the profitability of your business from day one.
This technology is already a pillar in Spain. A recent analysis of 300 prosthetic laboratories revealed that its adoption has already reached 61%. Over the last two years, its growth has been unstoppable, especially for the fabrication of models, occlusal splints, and temporary crowns. You can read more about dental digitalization in Spain here.
"Implementing a 3D printer means moving from artisanal work to precision engineering. It is not about replacing the technician, but about enhancing their skills with a tool that delivers consistent, ultra-high-quality results."
The change is more than evident. Digital dentistry, with the dental 3D printer as its driving force, is here to stay. It offers a faster, more precise, and more personalized service that benefits everyone: both the professional and, of course, the patient.
A look at printing technologies: SLA, DLP and MSLA
Not all resin 3D printers work the same way. In the world of precision dentistry, there are three technologies that take the crown: SLA, DLP and MSLA. To put it simply, it's like having three different artists, each with their own brush and technique, but with the same goal: creating a perfect piece. 🎨
Each of these technologies has its own method for solidifying liquid resin, and that directly influences speed, precision and, of course, price. Understanding their differences is key to choosing the dental 3D printer that truly fits your workflow and your patients' needs.
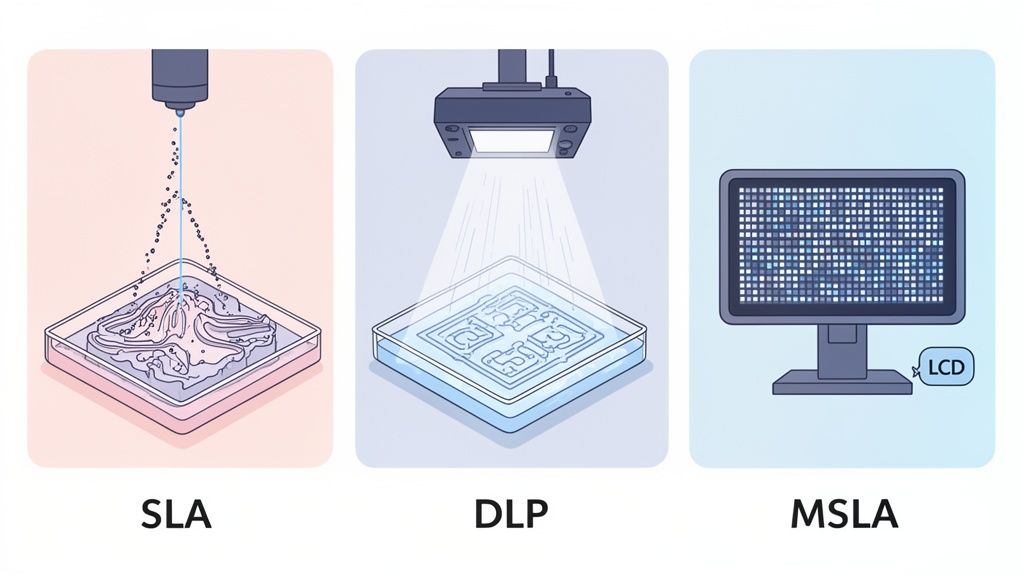
SLA: the fine detail artist
SLA (Stereolithography) technology was the first to arrive and remains the most meticulous of all. Imagine a draughtsman with a surgeon's steady hand, using an ultra-fine laser pen to trace every detail of the piece, point by point.
That laser, guided by a high-precision mirror system (galvanometers), travels across the resin surface to draw each layer. This method, though slow, achieves brutal surface quality and dimensional precision.
- The best 👍: Its precision is almost unbeatable. Perfect for complex dental models, crowns or surgical guides where every micron is sacred.
- The worst 👎: Speed is its Achilles' heel. Having to "draw" every contour makes the process considerably longer than other technologies, especially when printing large pieces.
DLP: the high-speed projector
DLP (Digital Light Processing) technology takes the concept up a notch. Instead of a laser that draws point by point, it uses a digital projector, much like the one you'd find in a cinema.
This projector flashes the complete image of the layer all at once, like a flash, onto the resin vat. By curing an entire area in one go, printing speed shoots up. The resolution of the final piece will depend on the projector's resolution and the size of the area it illuminates.
The great advantage of DLP technology is that printing speed is not affected by how many pieces you place on the platform. Printing a single dental model takes exactly the same time as printing ten, because the entire layer is cured at once.
MSLA: the intelligent balance
And finally we come to MSLA (Masked Stereolithography), the technology that has brought high-quality resin 3D printing within everyone's reach. It is, essentially, a smarter and more affordable evolution of DLP.
Instead of an expensive projector, MSLA uses a monochrome LCD screen that acts as a "mask" or template. This screen is placed between a powerful UV LED light source and the resin vat. The screen blocks light where it is not needed and only lets it through in the areas that must solidify to form the layer.
- The winning combination 🏆: Offers extremely high speeds, very similar to those of DLP.
- High resolution 🔬: Sharpness depends on the pixel density of the LCD screen, which in current models is incredibly high.
- Lower cost 💰: The use of more common components, such as LCD screens and LEDs, makes these printers much more affordable, both when purchasing them and when maintaining them.
This cocktail of speed, quality, and cost has made MSLA technology the go-to option for the majority of dental applications today.
If you're curious and want to learn more about how these machines work, take a look at our article on resin 3D printers. Understanding the pros and cons of each technology well is the first step to making a smart investment.
The universe of biocompatible dental resins
The real magic of a dental 3D printer lies not in the machine, but in the material it uses. 🧪 This is where biocompatible resins come into play — the secret ingredient for manufacturing safe and functional parts that will be in direct contact with patients.
A resin being biocompatible is not just a fancy label. It means it has passed a whole host of incredibly strict tests and health regulations to guarantee it is completely safe for the body, even when worn for extended periods. In dentistry, this is non-negotiable.
But be careful — there is no one-size-fits-all resin. Each clinical application, from a simple study model to a temporary crown, requires very specific mechanical and aesthetic properties. That is why the world of dental resins is so broad and specialized.
Types of resins by application
Choosing the right resin is like selecting the correct tool in a workshop. You wouldn't try to tighten a screw with a hammer, would you? Well, the same applies here. Each resin is formulated to excel at a specific task.
Here is a breakdown of the most common ones:
- Resins for study models 🦷: These are the bread and butter of any laboratory. They are designed to be super precise and stable, mimicking the hardness and feel of traditional plaster. They work great for creating diagnostic models, antagonists, or for manufacturing aligners.
- Resins for surgical guides 👨⚕️: Precision and safety are their middle names. They are usually transparent so the surgeon can perfectly see what they are doing and, most importantly, they can be sterilized in an autoclave. This is key to maintaining a 100% aseptic environment.
- Resins for temporaries (crowns and bridges) ✨: These resins are amazing. They combine stunning aesthetics, with colors that perfectly match the natural tooth, and hardness more than sufficient to withstand chewing for months without any issues.
- Resins for occlusal splints and orthodontics 😴: Here we look for a balance between being rock solid and having a touch of flexibility. They must resist wear and nighttime grinding, while being comfortable enough that the patient won't complain.
- Castable resins 🔥: These are designed for the lost-wax workflow. They burn out completely without leaving any trace of ash, allowing the creation of perfect patterns for cast metal crowns or pressed ceramic frameworks.
Knowing how to choose and handle these materials is just as important as mastering the 3D printer itself. Not only the quality of the final work depends on this, but also compliance with health regulations and ensuring patient safety. If your curiosity is piqued and you want to know more, we recommend taking a look at our complete guide on resin for 3D printers to discover all its secrets.
Quick guide to dental resins and their applications
So you don't get confused, we have put together this summary table with the applications and characteristics of each type of resin. You'll find it really handy to keep close!
| Resin Type | Main Application | Key Features ✨ | Product Example (MrResin.es) |
|---|---|---|---|
| Model Resin | Diagnostic models, orthodontics, antagonists. | High precision, dimensional stability, smooth surface, opaque color (similar to plaster). | Anycubic ABS-Like Pro 2 Resin |
| Guide Resin | Surgical guides for implants. | Biocompatible, transparent, autoclave-sterilizable, high rigidity. | Certified resins for medical use |
| Provisional Resin | Temporary crowns and bridges. | Biocompatible, high fracture resistance, dental aesthetics (A1-D4 shades), polishable. | Specialized dental resins |
| Splint Resin | Occlusal splints, mouthguards, retainers. | Biocompatible, high wear resistance, controlled flexibility for comfort. | Specific resins for splints |
| Castable Resin | Patterns for casting and pressing (metal and ceramic). | Clean burnout with no residue, high precision for a perfect fit. | Anycubic Craftsman Resin |
A friendly tip: always follow the manufacturer's instructions for handling, printing, and post-curing each resin. Post-processing curing is super important for the material to reach its final hardness and certified biocompatibility. Don't skip this step!
Mastering the digital dental workflow step by step
Bringing a dental 3D printer into the clinic or laboratory may seem like a mountain to climb, but the process is far more intuitive than it appears. At its core, it all comes down to a well-structured digital workflow with four key phases. Once you have them under control, you'll go from an on-screen design to a precise, functional clinical solution in the blink of an eye. 🏃💨
This digital path is the key to achieving high-quality results that can be repeated time and time again. Let's break down each stage so you can see there are no secrets here — just a logical process that will change the way you work forever.
Stage 1: Scanning and design (CAD) 💻
Everything starts with data capture. Say goodbye to uncomfortable alginate trays. Now, with an intraoral scanner, we capture the patient's anatomy in minutes with incredible precision. This "digital impression" gives us a 3D file (usually in STL format), which is the cornerstone of the entire process.
That digital model is taken into Computer-Aided Design (CAD) software, such as Exocad or 3Shape. This is where the magic happens: we plan surgical guides, model provisional crowns, design occlusal splints, or prepare models for orthodontics. It's a 100% digital phase where clinical expertise and creativity come together to create the tailored solution.
Stage 2: Print preparation (Slicer) 🔪
Once we have the 3D design ready, we can't simply send it straight to the printer. First, it needs to be "translated" into a language the machine understands. That's where slicing software comes in — better known as a slicer (programs like PreForm or ChiTuBox are the go-to choices here).
This program takes the STL file and, literally, slices it into hundreds or thousands of ultra-thin horizontal layers. This is where we make critical decisions that make the difference between success and failure:
- Part orientation: We decide how to place the model on the print platform. A good orientation optimizes surface quality and reduces working time.
- Support generation: We create a kind of very thin scaffolding that holds the part in place while it prints, preventing gravity from warping it or causing it to fall.
- Print settings: We adjust parameters such as the thickness of each layer or the UV light exposure times, depending on the resin we use and the precision we are looking for.
Good slicing is just as important as a good design. It is the bridge that ensures the print comes out perfect.
This diagram visually summarizes the entire workflow, from having the design on the computer to the part being ready to use.
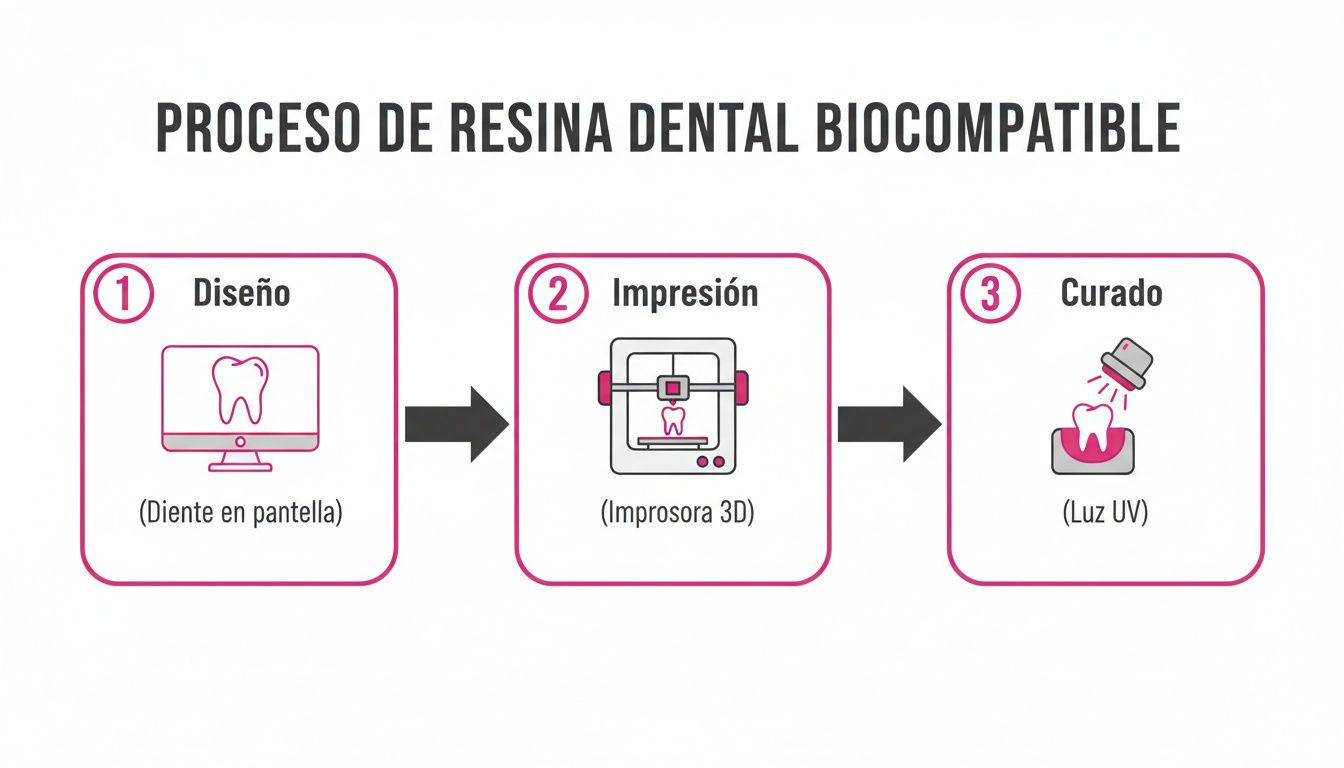
As you can see in the image, it is a logical sequence where each step lays the foundation for the next. This ensures a predictable final result of the highest quality.
Stage 3: 3D Printing 🖨️
Now we get to the moment of truth! This is where the dental 3D printer gets to work. The machine begins to solidify the liquid resin, layer by layer, following to the letter the instructions we have sent from the slicer.
Depending on the technology used (SLA, DLP or MSLA), the speed and curing method will vary slightly, but the principle is the same: building a physical object from a digital blueprint. It is an almost fully automated process that can take anywhere from 30 minutes to several hours, depending on the size and complexity of what we are printing.
Stage 4: Final Post-Processing 🧼✨
Thinking that the work ends when you take the part out of the printer is a beginner's mistake. Post-processing is a critical stage, essential for the final product to have the right mechanical properties and, most importantly, to be biocompatible. Skipping this step or doing it poorly means throwing all the previous work down the drain.
Post-processing has two mandatory phases:
- Washing: The freshly printed part is sticky, covered in uncured liquid resin. It must be submerged in a solvent (almost always isopropyl alcohol or IPA) and thoroughly cleaned, either by hand or with an automatic washing station. This removes all residue and leaves a perfectly clean and defined surface.
- Final curing (Post-curing): Once clean and dry, the part moves to a UV curing chamber. There it receives a "bath" of ultraviolet light at a specific wavelength for a controlled period of time. This step completes the polymerization of the resin, giving it its maximum hardness, stability and, crucially, certifying its biocompatibility so it can be used in the mouth with complete safety.
Mastering these four steps will allow you to integrate 3D printing into your clinic or laboratory in a smooth and highly efficient way. If you want to dive deeper into the subject, we recommend taking a look at our complete guide on how to 3D print with resin, where you will find more advanced tips and tricks.
How to choose the ideal dental 3D printer for your business
Choosing your first dental 3D printer is one of the most important decisions for the future of your clinic or laboratory. 🧐 It's not just about buying a machine, but about investing in a technology that will radically change the way you work.
Rather than being swayed by flashy names or brands, let's think like true experts and analyze the factors that really matter for making a smart, profitable choice. With this guide, you'll learn to evaluate the five key criteria that differentiate a simple printer from a genuine production tool.
By the end, you'll have the confidence you need to select the equipment that not only meets your expectations, but exceeds them by far.
Precision and resolution
In dentistry, precision is non-negotiable. It is, quite simply, the most important quality. 🎯
If a splint doesn't fit perfectly or a surgical guide has even a slight deviation, the treatment fails. Precision is the printer's ability to faithfully replicate the digital model, while resolution (measured in microns) defines the smallest level of detail it can create.
For serious dental applications, look for printers with an XY resolution of 50 microns or less. This ensures that crown margins, contact points and fitting surfaces are perfect, eliminating the need for manual touch-ups and guaranteeing patient satisfaction.
Print volume and speed
The print volume determines how many parts you can produce in a single run. Printing a single temporary crown is not the same as a full tray with ten orthodontic models. ↔️ A larger print platform gives you more flexibility and, above all, the capacity to scale your production when you need it.
On the other hand, speed is key to the efficiency of your workflow. ⚡ Technologies such as MSLA have drastically accelerated print times, making it possible to print a surgical guide in under an hour. A fast cycle means you can reduce patient waiting times and increase the profitability of your business.
Resin compatibility: the key to freedom
This is, without a doubt, one of the most decisive factors and one that, curiously, is often overlooked. Some printers operate within a "closed ecosystem", which forces you to use exclusively their own resins, which tend to be considerably more expensive.
An "open platform" printer, on the other hand, gives you complete freedom to choose. 🕊️
An open platform printer allows you to use third-party resins, such as those you'll find at MrResin.es. This not only gives you access to a much wider range of innovative and specialized materials, but also allows you to optimize costs without sacrificing a single bit of quality.
Choosing an open system is a strategic decision. It will give you the flexibility you need to adapt to new material technologies and maintain control of your costs in the long term.
Technical support and total cost of ownership
A printer is a long-term investment, and the purchase price is only the beginning of the story. You must consider the total cost of ownership, which includes several hidden factors:
- Consumables: Resin tanks, build platforms, FEP films, etc.
- Maintenance: Costs of possible repairs or replacement parts.
- Software: Watch out, because some brands charge annual licenses for their preparation software.
Also, make sure your supplier offers reliable technical support in Spanish. 🤝 When a problem arises — and it will — you need a quick response so your production doesn't grind to a halt. Good after-sales service is worth its weight in gold.
The global dental 3D printing market is in full expansion, and it's no coincidence. It is projected to reach $9.5 billion by 2027. This boom is driven by the massive adoption of this technology by professionals who, like you, are looking for greater efficiency and precision. Discover more about this growth in the dental sector.
Frequently asked questions about dental 3D printing
Making the leap to digital dentistry with a dental 3D printer is an exciting step, but it's perfectly normal to have a thousand questions swirling around in your head. 🤔 Don't worry! Let's clear up the most common doubts so you can start this journey with complete confidence.
Is this technology too expensive?
This is the million-dollar question. If you only look at the price tag, the initial investment can seem high, but you'd be missing the full picture. The real question is: how long will it take to recover the cost? 💰
The key lies in everything you stop spending. Every time you print a model, a splint, or a surgical guide in your own practice, you're saving yourself the external lab bill and the shipping costs. Not to mention that production times plummet, allowing you to see more patients and keep a much more streamlined schedule.
By bringing production in-house, many practices recover their investment in less than a year. Profitability isn't a distant promise — it's a benefit you notice almost from day one.
Do I need to be a tech expert?
Not at all! Forget the idea that 3D printing is for engineers. Today's dental printers are built so that any professional can use them without losing their mind. 👨⚕️ The preparation software (or slicer) is super intuitive, with automatic features that guide you to position the pieces and add support almost effortlessly.
The learning curve is very gentle. With the right support and the training we provide, you'll feel comfortable from your very first print. On top of that, these machines are incredibly reliable, with success rates that exceed 99% on many models. They are true workhorses.
What biocompatibility regulations do I need to follow?
There are no grey areas here: patient safety is sacred. 🛡️ For any piece that will be placed in the mouth (splints, guides, temporary crowns), it is absolutely mandatory to use resins with biocompatibility certification, such as Class I or Class IIa.
This means they must carry the CE marking and comply with all medical device regulations. Using approved resins is not just a legal matter — it is the guarantee that you are offering safe, highest-quality treatment.
How long does printing actually take?
Speed is one of the superpowers of this technology. Although times vary depending on the size of the piece and the level of detail you need, here's a quick reference so you can get a realistic idea: ⏱️
- A single dental model: It can take between 30 and 60 minutes.
- A surgical guide: Allow around 45-60 minutes.
- A full tray with 4-6 splints: Between 1.5 and 3 hours, more or less.
These times allow you to organize your clinic's production in an incredibly efficient way, being able to offer same-day solutions to your patients. This rapid growth demonstrates that the technology is becoming increasingly accessible and productive. In fact, the dental market is projected to record an annual growth rate of 19.5% between 2024 and 2029, and Spain is in an ideal position to take advantage of this trend. Discover more about dental sector projections here.
Conclusion:
We've reached the end of this journey and the main idea is clear: the dental 3D printer is no longer the future — it is the most profitable and efficient present for your clinic or laboratory. We've seen how it transforms workflow, reduces costs and elevates precision to a level that was unthinkable with traditional methods. 💡
In summary:
- You save time and money: By bringing production in-house, you forget about external laboratories and shorten turnaround times.
- You gain in precision: Every piece is an exact replica of the digital design, with no human errors.
- You offer a better service: Treatments are faster and more personalized, which translates into more satisfied patients.
Don't let your clinic fall behind in the digital revolution. 💪 We invite you to explore our online store at MrResin.es to find the printer and resins you need to make the leap. 🛒
And to stay up to date with everything, subscribe to our Newsletter and join our Telegram community at https://t.me/MrResin3D to access exclusive discounts, deals, news and events. We look forward to seeing you there! 🔔
✨Happy Printing! 🚀