
In essence, resin 3D printing is a form of manufacturing that creates objects by solidifying liquid resin layer by layer with ultraviolet (UV) light. Unlike filament 3D printers that melt plastic, this technology is more like sculpting with light. The result is parts with smooth, precise surfaces and a spectacular level of detail, perfect for miniatures, jewelry, or fine prototypes.
What resin 3D printing is and why it's a winner

Can you imagine being able to produce parts with near injection-mold quality, right on your own desk? 🤔 Well, that's exactly what resin 3D printing is all about. It's no longer a technology exclusive to large laboratories — it's made its way into the workshops of creators, designers, and hobbyists all over the world.
The magic behind it all is called photopolymerization. Don't let the word scare you — it's simpler than it sounds. Think of it like developing a photograph, but in three dimensions.
A build plate lowers into a vat filled with liquid resin. A UV light source projects the image of the first layer from below, and the resin hardens instantly wherever the light hits it. The plate rises slightly, the resin flows back to cover the gap, and the process repeats over and over until the part is complete. The result is a solid object with a level of detail that filament (FDM) 3D printers can only dream of.
The technologies that make it possible
Although the principle is the same — light solidifying resin — there are three main ways to achieve it. Understanding them will help you grasp why some 3D printers are faster or more precise than others.
- SLA (Stereolithography): The original technology, the grandmother of them all. It uses a high-precision laser 🎯 that traces the outline of each layer point by point. It's incredibly precise, but also the slowest, because the laser has to travel across the entire surface.
- DLP (Digital Light Processing): Instead of a laser, this system uses a digital projector. It flashes the complete image of the layer all at once, like a cinema projector. This makes it much faster than SLA, especially when printing large parts or many at a time.
- MSLA (Masked Stereolithography): The rock star of the bunch! 🤘 This is the technology that has democratized resin 3D printing. It uses a monochrome LCD screen that acts as a mask in front of a powerful UV LED light. The screen simply becomes transparent where you want to solidify the resin and opaque where you don't. This way, an entire layer cures in an instant. It's incredibly fast, cost-effective, and the most common technology found in the 3D printers used by the majority of hobbyists and professionals today.
The main reason resin 3D printing is everywhere is its outstanding ability to reproduce tiny details with astonishing fidelity. From the chain mail on a 28mm miniature to the inlays of a dental prototype, the resolution is simply spectacular.
This precision has opened up a whole new world. Artists, engineers, jewelers, and makers can now bring their digital designs to life with professional quality without leaving home. Its success is no accident — it's the result of putting an ultra-high-definition technology within everyone's reach. 🚀
The key technologies: SLA, DLP and MSLA explained

Alright, we've got the basic concept down: resin 3D printing is like "sculpting with light" 🔦. Now it's time to get into it and see how each type of printer actually does it. There are three main technologies behind this magic, and understanding their differences is the key to knowing why some are faster, others more precise, and others much more affordable.
Let's break down these acronyms so that the next time you see SLA, DLP or MSLA, you'll know exactly what's going on.
SLA: the pioneer of millimeter-precision
SLA (Stereolithography) is where it all started — the original technology. Imagine you have a laser pen ✏️ with an incredibly fine tip. This laser patiently traces the exact outline of each layer across the liquid resin, solidifying it point by point as it goes.
This meticulous method achieves spectacular precision and surface finish, with almost no visible layer lines. But of course, its greatest strength is also its Achilles' heel: because it has to "draw" every millimeter of the layer, it's quite a slow process. If the part is large or highly detailed, the printer will take its sweet time.
DLP: the projector that cures entire layers at once
DLP (Digital Light Processing) technology represented a massive leap in speed. Instead of the laser pen, DLP printers use a digital light projector, much like the one you might have in a home cinema. This projector flashes the complete image of the layer all at once, like a single frame of a film. 🎬
The direct result? Print speeds that are much, much faster than SLA. Since the entire layer cures at the same time, it doesn't matter whether you're printing one miniature or ten at once — the time per layer stays the same. Resolution here depends on the projector's pixels, just like a television screen.
MSLA: the revolution that changed everything
And here we have the rock star of today's market: MSLA (Masked Stereolithography). If you own or are thinking about buying a resin printer from brands like Anycubic or Elegoo, chances are it will be MSLA. It's the technology that has democratized access to this level of print quality.
The way it works is brilliantly simple: it combines a powerful UV LED light source with a monochrome LCD screen placed just above it. This screen acts as a template or "mask," turning transparent only in the pixels that make up the layer while blocking light everywhere else. This way, it cures the entire layer at once, like DLP, but using far more affordable components.
The success of MSLA is easy to understand: it delivers very high speed, excellent resolution and a much lower manufacturing cost. It's the reason why today we can have top-quality resin printers at home without breaking the bank.
The growth of 3D printing is undeniable. In Europe alone, the consumables market for this technology is expected to reach $641.68 million in 2025. While these figures include filaments for FDM printers, they demonstrate the incredible dynamism of a sector where resin plays a key role in rapid prototyping and part manufacturing across industries such as automotive and aerospace.
Comparison of SLA vs DLP vs MSLA resin printing technologies
To make everything crystal clear, nothing beats a comparison table. Here you can see at a glance what each technology offers and what each one is best for.
| Feature | SLA (Laser) | DLP (Projector) | MSLA (LCD) |
|---|---|---|---|
| Light Source | A single UV laser | Digital light projector | UV LED array + LCD Mask |
| Speed | Slow (draws point by point) | Fast (projects the entire layer) | Very fast (projects the entire layer) |
| XY Resolution | Depends on laser spot size | Depends on projector resolution | Depends on LCD screen size and resolution |
| Printer Cost | High 💰💰💰 | Mid-High 💰💰 | Low-Mid 💰 |
| Maintenance | Complex (laser calibration) | Moderate (projector bulb replacement) | Simple (the LCD screen is a consumable) |
| Ideal for... | Ultra-high precision prototypes, molds. | Jewelry, dental, professional applications. | Hobbyists, miniatures, general prototyping. |
As you can see, there is no "better" technology than another in absolute terms; each one simply has its niche. MSLA dominates the home market thanks to its incredible value for money, while SLA and DLP remain the top choices in very specific professional sectors where the investment is justified.
If your curiosity has been sparked and you want to learn more about the original technology, we recommend reading our article on the advantages and applications of SLA printing.
How to choose the perfect 3D resin for your project

Diving headfirst into the world of resin 3D printing is amazing, but with so many bottles on the market, choosing the right one can feel like a maze. 😵💫 Don't stress — that's what we're here for. Every type of resin has its purpose, and the key to getting it right is simple: ask yourself what you're going to create.
Think of resin as the soul of your print. It determines the hardness, flexibility, level of detail, and even how easy (or tedious) post-processing will be. Printing a display figure is not the same as printing a mechanical part that will take knocks and pulls. Understanding what each resin is for is the first step to nailing your results from day one.
Standard resin: the ideal starting point
Standard resin is, by far, the most popular. It's the workhorse for most makers and hobbyists. Why? It's affordable, easy to use, and offers more than enough detail to get started with printing. 🎨
Its great advantage is the perfect balance between cost and quality. It works wonderfully for decorative figures, prototypes you only need to see (not touch), and any object that won't be subjected to much stress. Brands like Anycubic or Elegoo have a huge color range, so it's the logical choice for your first projects.
Water-washable resin: convenience above all
Done with the hassle of isopropyl alcohol (IPA) and its smell? Then water-washable resin is for you. The name says it all: it cleans with tap water, nothing more. This massively simplifies post-processing. 💧
This convenience makes it a great option for beginners or for those who have their workshop at home and prefer to avoid chemicals and strong smells. Although it's slightly more fragile than standard resin, the ease of use is a big plus that makes up for it for most figures and models.
ABS-Like resin: for parts that take a beating

When you need your parts to not only look great but also be tough as nails, ABS-Like resin comes into play. It's formulated to mimic the mechanical properties of ABS plastic, which translates into greater toughness and impact resistance. It's simply more robust. 💪
It's the logical choice for functional prototypes, assembly parts, electronics housings, or any component that needs to take a beating. If you're going to print something that needs to be screwed, press-fit, or that might take a knock, this resin will give you the peace of mind you're looking for.
In fact, here in Spain, standard resin and ABS-Like are the undisputed kings. The data confirms it: between the two, they account for over 60% of total sales. This shows that both hobbyists and professionals are looking for versatile materials that combine ease of use with solid resistance.
To make it easier for you to decide, we've put together this summary table of the most common resin types.
Quick guide to choosing your 3D resin
| Resin Type | Main Feature | Ideal For | Product Example |
|---|---|---|---|
| Standard | Cost-quality balance | Figures, visual prototypes | Anycubic Standard Resin |
| Water-Washable | Cleans with water | Beginners, figures | Anycubic Water-Washable |
| ABS-Like | High resistance and toughness | Functional parts, housings | Elegoo ABS-Like Resin |
| Flexible (Tough) | Elasticity and durability | Gaskets, shock absorbers | Siraya Tech Flexible Resin |
| High Definition | Maximum detail | Miniatures, jewelry | Anycubic High Precision 14K |
| Transparent | Crystal-clear finish | Lenses, visual effects | eSun Transparent Resin |
We hope this cheat sheet gives you a starting point. Now, let's take a look at some more specialized options.
Flexible and high-definition resins (8K/14K): for special projects
For more specific uses, there are resins with unique properties that open up a whole new range of possibilities for you.
-
Flexible or Tough resins: Do you need to create parts that can bend, stretch, or compress without breaking? These resins are perfect for simulating rubber, creating gaskets, shock absorbers, or prototypes that need some elasticity. They are both hard and flexible at the same time.
-
8K/14K resins (High Definition): These are designed for the latest generation of 3D printers, the ones with screens featuring an incredible resolution. With them you can capture even the finest detail, making them the ultimate option for miniatures with very fine textures, jewelry, or any application where microscopic precision is what matters most. ✨
Transparent resin: for incredible visual effects
Finally, transparent resin allows you to create crystal-clear parts. It is ideal for lens prototypes, casings that let you see the internal components, or for simulating visual effects like water, ice, or gems on your miniatures. 💎 That said, it requires more meticulous post-processing to achieve full transparency, but the final result is simply spectacular.
As you can see, choosing the right resin does not have to be a headache. If you want to dive even deeper, with comparisons and expert advice, we recommend you take a look at our complete guide on resin for 3D printers. Understanding your materials well will give you the confidence to take your projects to the next level.
Your workflow: from screen to finished part, step by step
The magic of resin 3D printing lies in turning an idea that lives on your computer into an object you can actually touch. Although it may seem overwhelming at first, it really all comes down to a series of logical steps that, once you master them, will allow you to achieve perfect parts without frustration or drama. 🚀
We are going to break down the complete journey, from the moment you have your 3D file on screen to the moment you hold the cured and finished part in your hands. We will divide it into four key phases: model preparation, the printing itself, post-processing, and final curing.
This diagram gives you a general idea of the path you are going to follow, a process you are about to master.
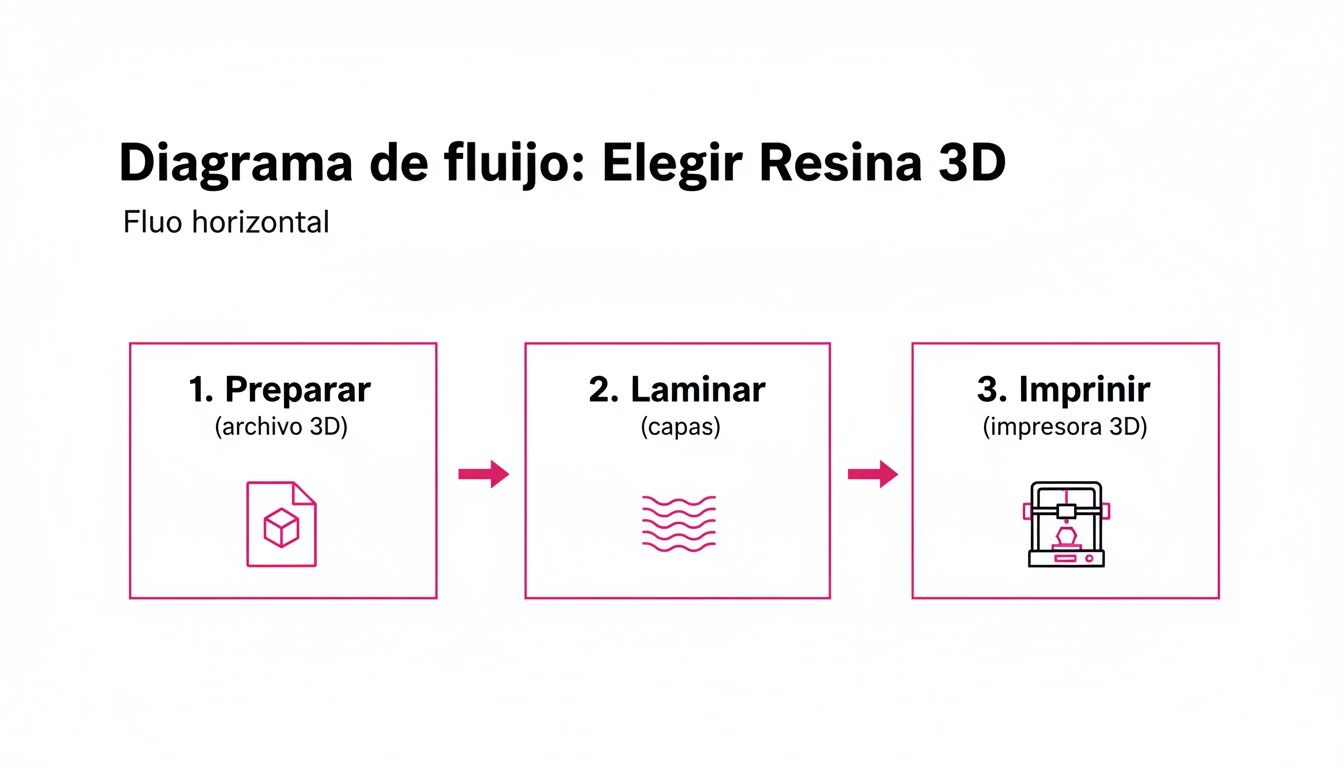
As you can see, everything starts with a digital model that we prepare, slice, and send to the 3D printer. Let's get into it.
Phase 1: Model preparation in the Slicer
The first step is 100% digital and takes place in a program known as a slicer (the most popular ones are ChiTuBox or Lychee Slicer). This software takes your 3D file (usually in .STL format) and slices it into hundreds, or even thousands, of very thin horizontal layers. These are the "slices" that the 3D printer will solidify one by one.
This is where a large part of your success is determined. The decisions you make here are crucial:
- Orientation: How do you place the part on the build plate? Poor orientation can create "islands" (parts that start printing in mid-air) or generate large flat surfaces that detach due to suction. The golden rule is usually to tilt the model about 30-45 degrees.
- Support: These are the small structures generated to hold up the parts of the model that would otherwise be left floating in mid-air. They are absolutely essential, but they also leave marks when removed. The art lies in placing just the right amount to prevent print failure, without ruining the surface details.
Think of supports like the scaffolding of a building under construction. Without them, the upper floors would collapse before they were finished. In resin 3D printing, they are equally vital for holding up overhangs and complex geometries.
Phase 2: Printing
With your model already sliced and saved to a USB drive, it's time for the moment of truth. You pour the resin into the printer's vat, plug in the USB drive and select the file to hit "play". Although the machine does almost all the work, you need to make sure the print settings are correct for the resin you are using.
The most important setting is, without a doubt, the exposure time per layer. This value, which typically ranges between 1.5 and 3 seconds for normal layers, tells the printer how long to switch on the UV light for each layer. If you go too short, the resin won't cure properly and the part will come out soft or with defects. If you go too long, you'll burn the details and lose definition. 🧐
Phase 3: Post-processing, washing and support removal
When the printer beeps, you're still not done! The part comes off the build plate completely covered in liquid, sticky resin. This post-processing phase is just as important as the printing itself to achieve a professional finish.
- Washing: The first step is to thoroughly wash the part to remove any uncured resin residue. The most common method is to use isopropyl alcohol (IPA). To make this task easier and cleaner, there are washing stations such as the Anycubic Wash & Cure, which automatically agitate the alcohol and leave the part spotless in minutes.
- Support removal: Once the part is clean and dry, it's time to remove the supports using flush cutters. A great tip is to do this before the final curing, as the part is still slightly softer and the supports come off more easily, leaving fewer marks.
Phase 4: Final curing
And we reach the last step: curing. The part you take out of the printer is solidified, but has not yet reached its maximum hardness. For it to be fully stable and resistant, it needs one final dose of UV light. ☀️
You could leave it in the sun (if you're lucky and the weather is good), but the ideal and most professional option is to use a UV curing station. These machines emit ultraviolet light in a controlled and uniform way from all angles thanks to a rotating platform, ensuring complete curing in a matter of minutes. This final step is what gives the part its definitive mechanical properties, turning it into a functional and durable object.
Safety tips for handling resins like a professional
3D printing with resin is an incredibly rewarding hobby, but let's be clear: we're working with chemicals. 🧪 The good news is that, with a few common-sense precautions, it's a completely safe activity. It's not about being afraid, but about having respect and following good practices.
The first and most important rule is to always protect yourself. Liquid resin and the vapors it emits can irritate your skin and respiratory tract. So, before you even think about opening a bottle of resin, make sure your Personal Protective Equipment (PPE) is ready and within reach.
Your essential protective gear
You don't need to dress like an astronaut on a space mission, but you do need the right tools to work with confidence. Your basic protection kit is non-negotiable and must include, no exceptions:
- Nitrile gloves: These are your first line of defense. Unlike latex, nitrile holds up much better against resin chemicals. Always keep a box on hand and don't hesitate to change them if they get stained or torn.
- Safety glasses: You only have two eyes — take care of them! 👓 Protective glasses will prevent any careless splashes from landing where they shouldn't, especially when pouring resin or cleaning freshly printed parts.
- Organic vapor respirator: Be careful — not just any mask you have lying around will do. You need one with specific filters for organic vapors (type A1P2 or similar) to protect you from the volatile organic compounds (VOCs) emitted by resin.
Ventilation and waste management
In addition to protecting yourself, it's essential to take care of your workspace. Always print in a well-ventilated room. Ideally, have a window open or, even better, an extraction system to help circulate fresh air. This way, vapors disperse and odor is minimized.
A well-ventilated workspace is not a recommendation — it's a requirement. Safety in resin 3D printing starts with a proper environment that disperses vapors and ensures clean air while you create your projects.
Waste management is equally important. Never pour liquid resin down the drain! 🚫 Any waste you generate (stained paper, used gloves, part supports) must be cured under UV light until completely solid. Once hardened, you can safely dispose of it.
If you use isopropyl alcohol to wash your parts, that also requires some care. You can learn everything about its safe handling in our complete guide on the use of isopropyl alcohol.
This focus on safety is key, especially in a market that just keeps growing. The projections for 3D printing in Spain are staggering: the sector is estimated to surpass €10.125 billion before 2027. This explosive growth reflects the fact that more and more people are embracing this technology. For businesses like Mr Resin, this dynamism reminds us of the importance of educating the community so that everyone can enjoy their hobby safely and responsibly. If you're curious, you can read more about this growth in this study on the Spanish market.
We answer your questions: frequently asked questions about resin 3D printing
Diving headfirst into the world of resin 3D printing is amazing, but it's totally normal to be bombarded with a thousand questions at first. 🧐 Don't worry! That's what we're here for. We've put together the most common questions we receive so you can start your adventure on the right foot and with complete confidence.
Let's clear up those unknowns that are surely running through your head.
Is resin printing very expensive?

Not at all! This is one of the biggest surprises for those just starting out. A few years ago, this technology was the domain of labs and large businesses, but thanks to advances (especially with MSLA printers), today you can set up your own workshop at home for much less than you'd think.
- 3D Printer: There are entry-level models with spectacular quality for between €200 and €400.
- Resin: A one-litre bottle of standard resin, which is enough for a ton of miniatures and small projects, usually costs around €15 - €40.
- Accessories: Budget around €50 - €100 for the basics: gloves, a mask, isopropyl alcohol, and a few useful tools.
So for less than the cost of a mid-range mobile phone, you have a complete setup to create pieces with incredible detail. 💰
Is the smell of resin very strong?
Let's be honest: yes, both liquid resin and isopropyl alcohol (IPA) have quite a distinctive chemical smell. It's not exactly a pine air freshener and, as we already covered in the safety section, it's not recommended to breathe it in continuously.
The solution is common sense: good ventilation. Always work in a room where you can open a window. If you're printing heavily, consider installing a small extractor fan. Many modern printers already come with activated carbon filters that help significantly reduce the smell — a feature that's very much appreciated.
Are resin-printed parts very fragile?
The answer here is a big "it depends." It depends entirely on the resin you choose. A part made with standard resin will be somewhat brittle, like a hard plastic that can break if dropped. Ideal for display figures, but not for heavy use.
But if what you're looking for is hardness and durability, the range of options is incredible:
- ABS-Like Resin: Provides significantly greater toughness and impact resistance. Perfect for parts that will see regular use.
- Tough or Flexible Resin: Designed to withstand twisting, bending, and mechanical stress without breaking.
The key is simple: choose your material with its intended use in mind. A collector's miniature doesn't need the same durability as a drone casing.
What problems am I going to run into when starting out?
Print failures are part of the journey. Don't panic — it happens to everyone! The most common setbacks when you're getting started with resin 3D printing are usually these:
- The piece detaches from the build plate: This is almost always caused by poor platform leveling or because the exposure time for the first layers is too low. You need to give those initial layers enough time to grip firmly and create a solid foundation.
- Parts of the piece don't print (islands): This happens when an area of the model starts printing "in mid-air," with nothing underneath to hold it. The solution involves thinking carefully about the orientation of the piece in the slicer and placing support in strategic points.
- Details come out blurry or "soft": This is usually a clear symptom of overexposure. If the UV light cures the resin for longer than necessary, fine details get "burned" and lose sharpness. Try reducing the exposure time for each layer gradually.
These small setbacks are par for the course in the beginning. With a little practice, you'll learn to diagnose and fix them almost without thinking. 😉
Conclusion:
We've covered a good stretch together to demystify resin 3D printing. Now you know it's a powerful, affordable technology with incredible creative potential. We hope this guide has given you the push and the knowledge you needed to get started creating. 🤩
We invite you to visit our Mr Resin store, where you'll find everything you need for your workshop, from the best 3D printers on the market to a huge variety of resins and accessories from brands like Anycubic and Elegoo. Take a look and gear up like a pro!
And don't go it alone. Join our makers community. Head over to our Telegram group to grab discounts, stay up to date with the latest news, and get exclusive support that we only share with our people. It's the perfect place to ask questions and show off your creations! 💬
To never miss an offer, subscribe to our Newsletter! We'll send you coupons, access to pre-sales, and all the latest news straight to your inbox so you're always ahead of the curve.
✨��Happy Printing! 🚀